


OUTDOOR
OUTDOOR
Oh hey again. In this section you'll find plenty of tips on shooting outdoors and I'll be covering all of the different lighting scenarios that I use. I like to keep things simple on set and simple when I explain it so it should be pretty easy to follow along. Scroll on, friends!
CAVE LIGHT
CAVE LIGHT
CAVE LIGHT
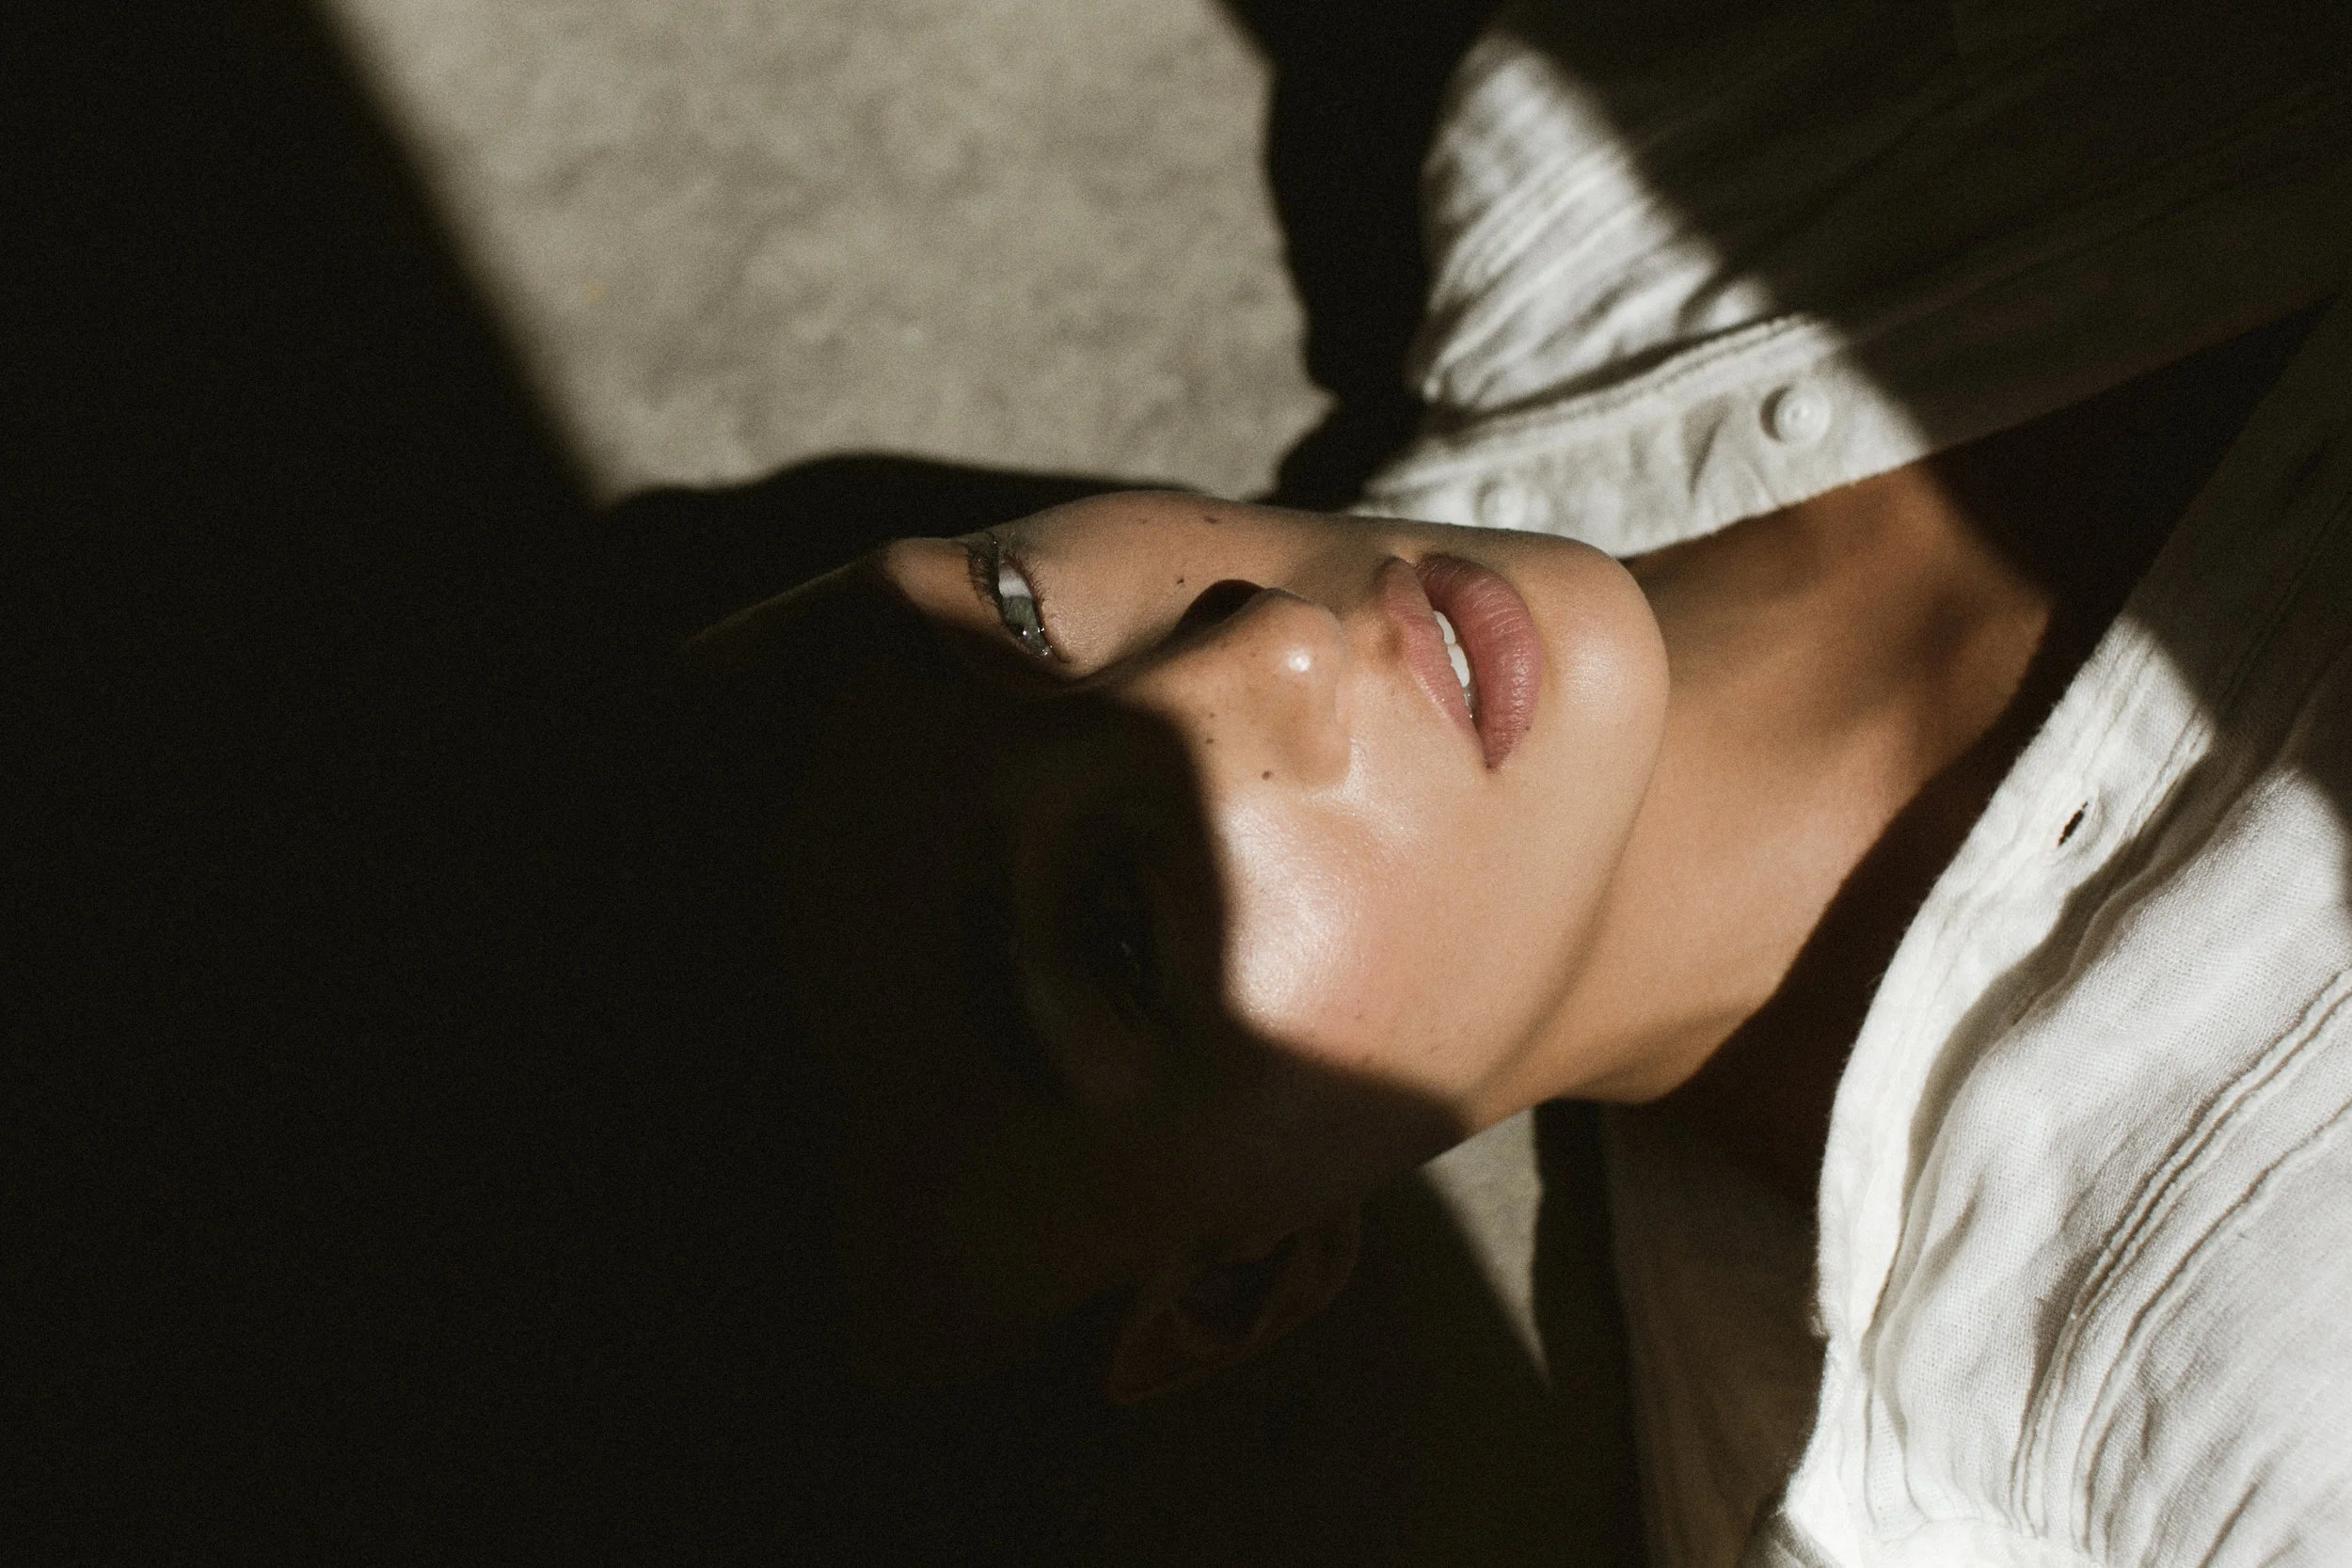
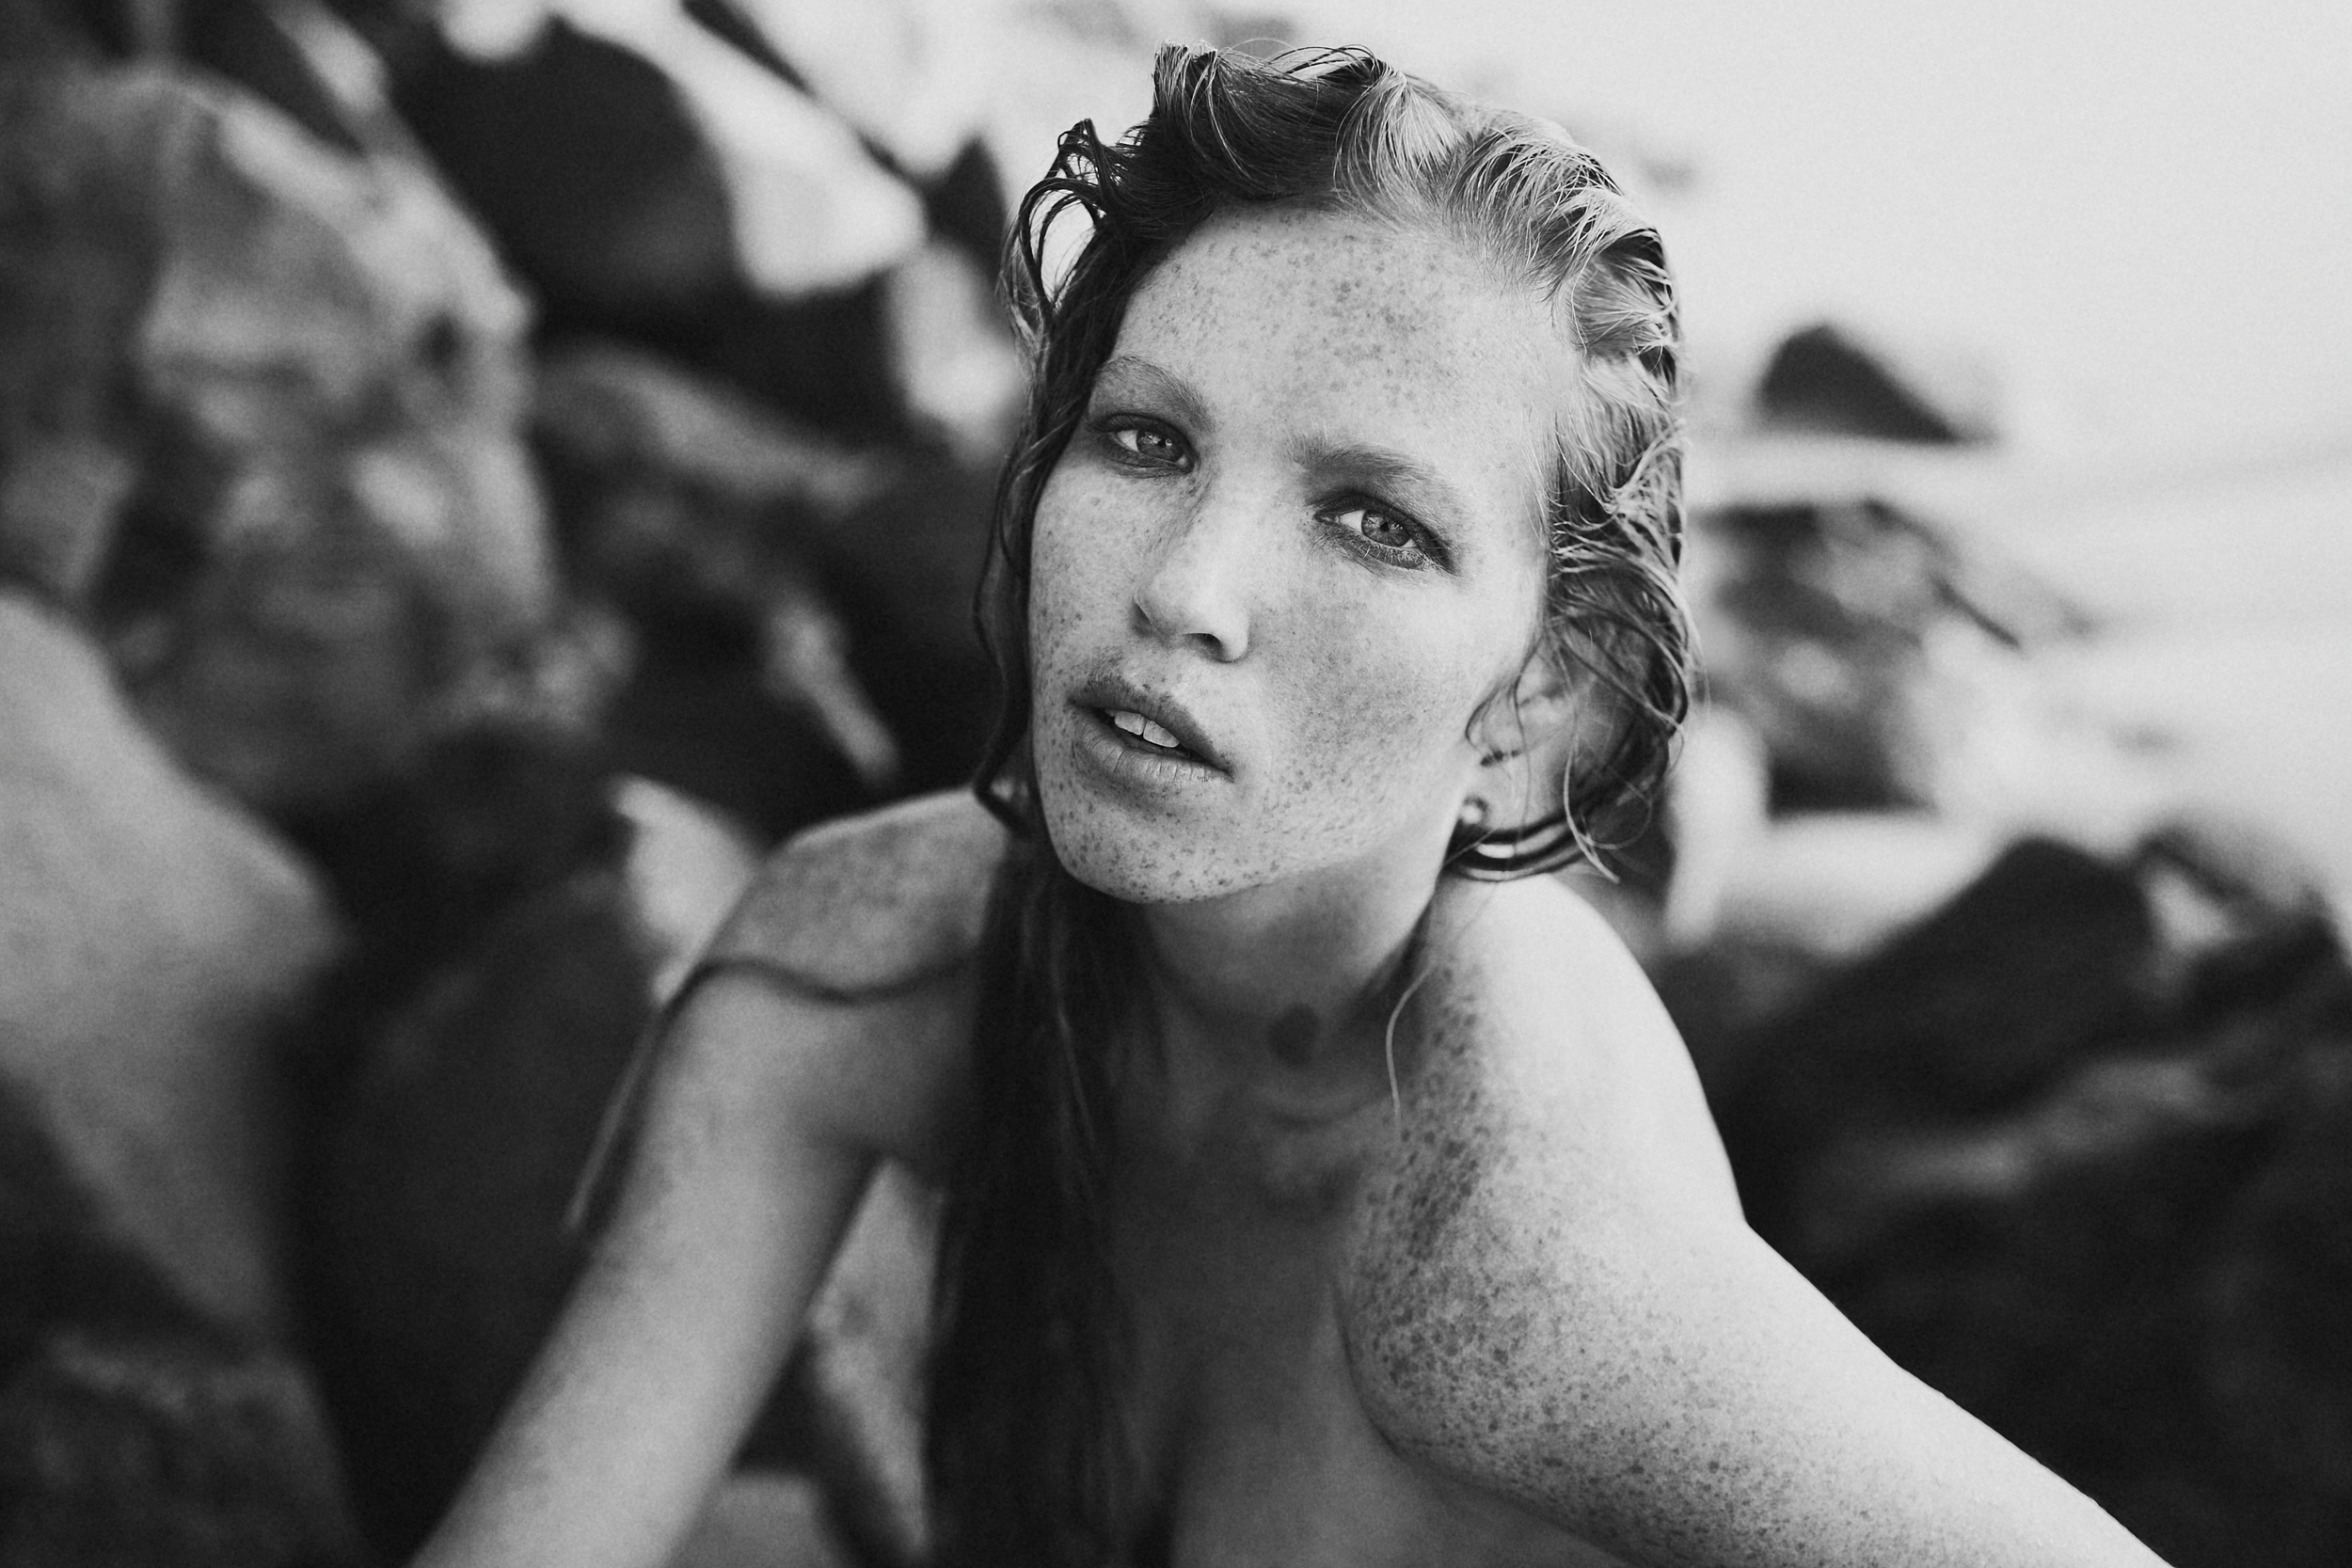
Since I typically shoot backlit, it means that my backgrounds are pretty bright since I expose to make sure that my subject’s skin (which is in shadow) is what has the correct exposure. It’s actually pretty rare that I have a background darker than my subject unless I’m shooting inside. even though I don’t seek out this type of light often, I love the look of it and wanted to make sure I included it in here so you have another trick in your bag! I call the type of light that I’m about to describe “Cave Light” because that visual is the best thing I’ve thought of to illustrate the point. Imagine that you place your subject right at the edge of a cave facing out of it. The light from the outside world is illuminating them while the light behind them is dark shadow. This tends to give the opposite look that back lighting can have. Back lighting will often give you a brighter background than subject while Cave Light will give you a bright subject with a darker background. That different in exposure helps your subject pop out of the background with a clean front light. Easy!

Contax 645 + 80mm + Kodak Portra 400
This frame of Sneha was shot in the modern day version of a cave, a garage. With indirect front light on her and the dark depth of the garage behind her, she pops out of the background and your eye goes right to her!

5D III + 35L
Awnings are perfect for cave light. At this spot (which was SO freaking rad) there was an open porch with an awning that I placed Melissa towards the front of. With awnings or even tree cover, the strongest soft light will fall right at the front of it and it will become darker the further under it you get.

5D III + 35L
Cave light comes in all shapes and sizes. Anywhere you can find a spot where your subject will be brighter than the background will do. In this frame, I placed Danny right towards the tips of the branches and in front of the darker center of the tree. The light falling on him was cut down by the branches as it got closer to the trunk.
FOCUS ON THE BACKGROUND
FOCUS ON THE BACKGROUND
FOCUS ON THE BACKGROUND
You know that whole thing about killer light being important? It goes for backgrounds too. Great light on your subject can be ruined by terrible light behind it. It took me a while to remember this one. I would see my images in post and slap myself in the brain every time I saw a potentially rad image ruined by terrible background light. It's something that always seemed to slip my mind while I was on set but once I began to focus on it more, I saw my keeper rate going up fast. Since I tend to shoot in soft light or back light, what always tended to ruin it for me was harsh light on the landscape behind the subject. It was this gorgeous luminous soft light enveloping my couple or model, and then this bright, patchy, overwhelming light with the power of a million suns in the background. Don't forget the rest of the frame when you shoot, it's all important!

5D III + 35L
This soft flattering light that fell on Cory and Bethany would have been pretty close to worthless for me if it wasn't falling everywhere else. That doesn't mean that every frame with harsh light in the background is worthless, but I've never been a fan of it for my own style. In this shot I killed the harsh light by hiding it behind the massive boulder behind them.

5D III + 35L
Cutting down on the harsh light in the background sometimes means waiting for the sun to drop lower before you take the shots that show a lot of it. I typically shoot images like this (where it shows a ton of distance) towards the end of a shoot so I don't have to worry about the hard light hitting anywhere off in the distance that I can't control. Once the sun drops to a certain point, the background goes from harsh to soft and it opens up way more opportunities for shooting.
NATURAL DIFFUSERS
NATURAL DIFFUSERS
NATURAL DIFFUSERS
Welcome to earth, folks. That place where the sun sometimes burns down to the earth so hard that we can't even step outside without sunglasses. Let's be honest here, sure it's a great light source and it keeps us warm but that sucker is powerful. That can mean awful and wonderful things for us as photographers (I'm sure you've all experienced the whole spectrum from love to hate for it). Luckily there is a way to cut down it's power a bit when we need to. The reason the sun has less power later in the day is because it has more air to cut through before it hits you. More air with dust, and water particles in it that diffuse it a bit. If you need it softened even more, why not look for some more diffusion to help you out? It might be easier than you think. Putting the sun behind tree branches is a ridiculously easy way to bring it down a notch while still keeping that gorgeous warm haze that it gives off.

5D III + 35L
When I need to cut down the harsh light on the background of an image I either wait for the sun to drop lower or shoot in front of a set that has a bit more shade. In some cases when the sun is a bit higher, I can use trees to cut the harsh light a bit. When the sun comes through the leaves, it spreads it out and dims it down. Hello, gorgeous, soft backgrounds.
FIND THE SHADE
FIND THE SHADE
FIND THE SHADE
One of the most common questions I'm asked when I'm speaking is "What if we have to shoot portraits at noon?" I get it. The sun at noon is disgusting. At certain times of the day I feel like the sun is putting in an effort to help me out and collaborate with me to create something awesome. At noon, I feel like it's thinking "Ben sucks and I hate him. Deal with this, idiot." Typically this question comes from wedding photographers since they aren't really the ones who are in charge of the schedule. My first response to this is always something along the lines of, "offer to help with the schedule." Our clients hire us because they trust that we will do what we need to to make sure that we leave them with the best images we can. I always offer to help my clients with the wedding schedule so we are making sure that we have killer light when we need it. 90% of the time, they are gracious and accepting of my input and 10% of the time they aren't able to move the schedule around for my sake. That's a huge amount of averted issues with light. It's better for both of you and doesn't take much effort on your part!
Of course, sometimes it's just not possible for them to move around the schedule and you're stuck shooting portraits at noon when the light is burning down with the power of hell-fire. I know, it's rough. If this happens, you have two options. One is to slightly back light your subject. Since you probably don't live on the equator, the sun will always be to one side of the sky or the other so you can always put it slightly behind your subject. This option is always my last resort when I have to shoot midday. My go-to is option number two, finding the shade. Trees, awnings, etc. Anywhere you can find a bit of shade can save you from the heat and the blazing light. Shoot your best and then try to steal them away for another 15 minutes at sunset as well!

5D III + 35L
I grew up playing in the Florida sun and LOVING it. Things took a dark turn when I started to shooting in it. The portrait above was shot at noon in the middle of summer with the sun blazing down. With mossy oak trees all over the property I put them in the shade and came out with some of my favorite bridal party portraits in a long time.
5D III + 35L
Summer. Texas. On a ranch. Nothing about that sounds like it's going to be easy with light despite how killer the wedding was. Adding portraits in harsh light didn't help the equation much but placing the two of them n the shade saved us from the heat andgave me the soft light that I love!

5D III + 35L
Sun, meet tree cover. Bye sun, nice try.
HARD LIGHT
HARD LIGHT
HARD LIGHT
When shooting in hard light, shadows are your frenemies. Sometimes, they add something freaking gorgeous to the frame, sometimes they make someones face look like a Picasso. Hard light can cast weird shadows across someone's face/body if they aren't positioned just right and/or if you aren't doing anything to brighten up the shadows.
The easiest trick do balance that out is to shoot somewhere that has a naturally reflective surface (sand, snow, light rocks, etc.). The image below was shot on white sand dunes (which were pretty much a huge reflector) which means the hard light became a lot less hard (that's what she said). If you don't have those kinds of environments to shoot in, this is where a reflector can come into play. I pretty much never use one ( I don't even own one) but they can be handy if you're into this type of light.

This next bit is actually a little section of a Before / After blog post I wrote about editing for hard light (linked below) that I wanted to include because it's pretty important information to understand when shooting in hard light!
...LIGHT / EXPOSURE
Let’s start with what we should always focus on first, the light. The type of light you work with is one of the most influential factors on your editing. Editing for hard light and soft light is a completely different ball game. My typical images have soft light on both the subjects and the backgrounds. That’s very important to my style since my tends to have a softer (although still contrasty) feel. In the image to the right, I wanted to keep that softness in my subject while playing with harder light in the background. My setup was simple. The sun was coming through a small circular diffuser on her right (your left) which shaded the top half of her body. Other than that, I let the hard light takeover.
Exposing shots like this is the same as I’d expose anything else. I underexpose the brightest thing I want to keep detail in. Did you follow that? In this shot, I wanted to keep detail in the sky and the skin (I wanted to keep some blue sky) and since the sky was brighter, I underexposed that. That left the skin much darker, but that’s okay because we can bring that up in post without losing details. On the other hand, if I exposed for the skin, I would have kept details there but would have blown out the sky. When shooting digital, if you blow something out, it’s gone forever. It’s always best to err on the side of underexposure (unless you’re shooting film).

TONES
Tones! Woohoo! If you’ve shot in both, you may have already realized that one of the biggest differences in soft/hard light is saturation. If you look at a blade of grass in the shade, you’ll see a soft, peaceful green. Move it into the sun and it turns into a freaking neon blaze of green hell fire. Sun = Saturation. It’s just simple math.
Why does this matter? If I want to keep my images in hard and soft light consistent with each other, I have to understand how to manipulate that saturation. This is where the glorious HSL tool comes into play. If you don’t know where that is, it’s the super confusing looking patchwork of sliders under the Tone Curve in Lightroom. This panel allows you to manipulate three things about each specific color: the hue, saturation, and luminance. For example, I could change the blues in the image (make them a different color, add/kill saturation, or change the brightness of them) without affecting any other color in the frame. Pretty dang handy... (Read the rest of this article about editing for hard light here)
OVERCAST LIGHT
OVERCAST LIGHT
OVERCAST LIGHT
Shooting in overcast and foggy conditions can be a huge relief at times but it also ends up being a bit trickier because it can be harder to figure out which light is good and which is bad until you bring the shoot in to edit. For the way I shoot, it's important to either be shooting fully front lit or fully backlit in conditions like this to keep the skin tones even and clean. With overcast light, if you have shadows on the skin they can tend to look murky. Since the difference between front light, side light, and back light is so subtle in light like this, an easy trick is to hold your hand out in front of you and squint at it until it turns into a blurred blob. From there, just spin around and you'll be able to see how the light falls on it a bit easier. Also, you won't look like a fool at all when you do that (probably not true).

5D III + 35L
One of the joys of overcast light is that it is much more forgiving in any direction than hard light would be. During Katie and David's engagement session, we were hit with classic Florida rain clouds for a portion of the shoot which gave me light soft enough to shoot from above without covering them with harsh sunlight. I've shot like this in the shade on sunny days as well but harsh sun coming through a tree will leave a green tint on anything below it. Not the best for skin tones!

5D III + 35L
During the Manchik's shoot at Rialto Beach in Washington, we got that typical PNW overcast light which meant I had to put a bit more thought into where the actual light was coming from. If you find yourself having trouble even with the blurred-hand tip, check out an app called Sun Seeker which will tell you exactly where the sun is in the sky. You can also use it for location scouting because it will show you where the sun will be at any time of any day in the future.
5D III + 35L
There is no point in complaining about a snowstorm. It creates gorgeous soft light (if you know how to use it), and a mood that you just don't get every day. I was so jazzed when the sky opened up for this shoot at Garden of the Gods in Colorado but since it was so overcast, I had to use the old squint-at-your-hand trick a ton to make sure I was shooting in the best light.

5D III + 50L
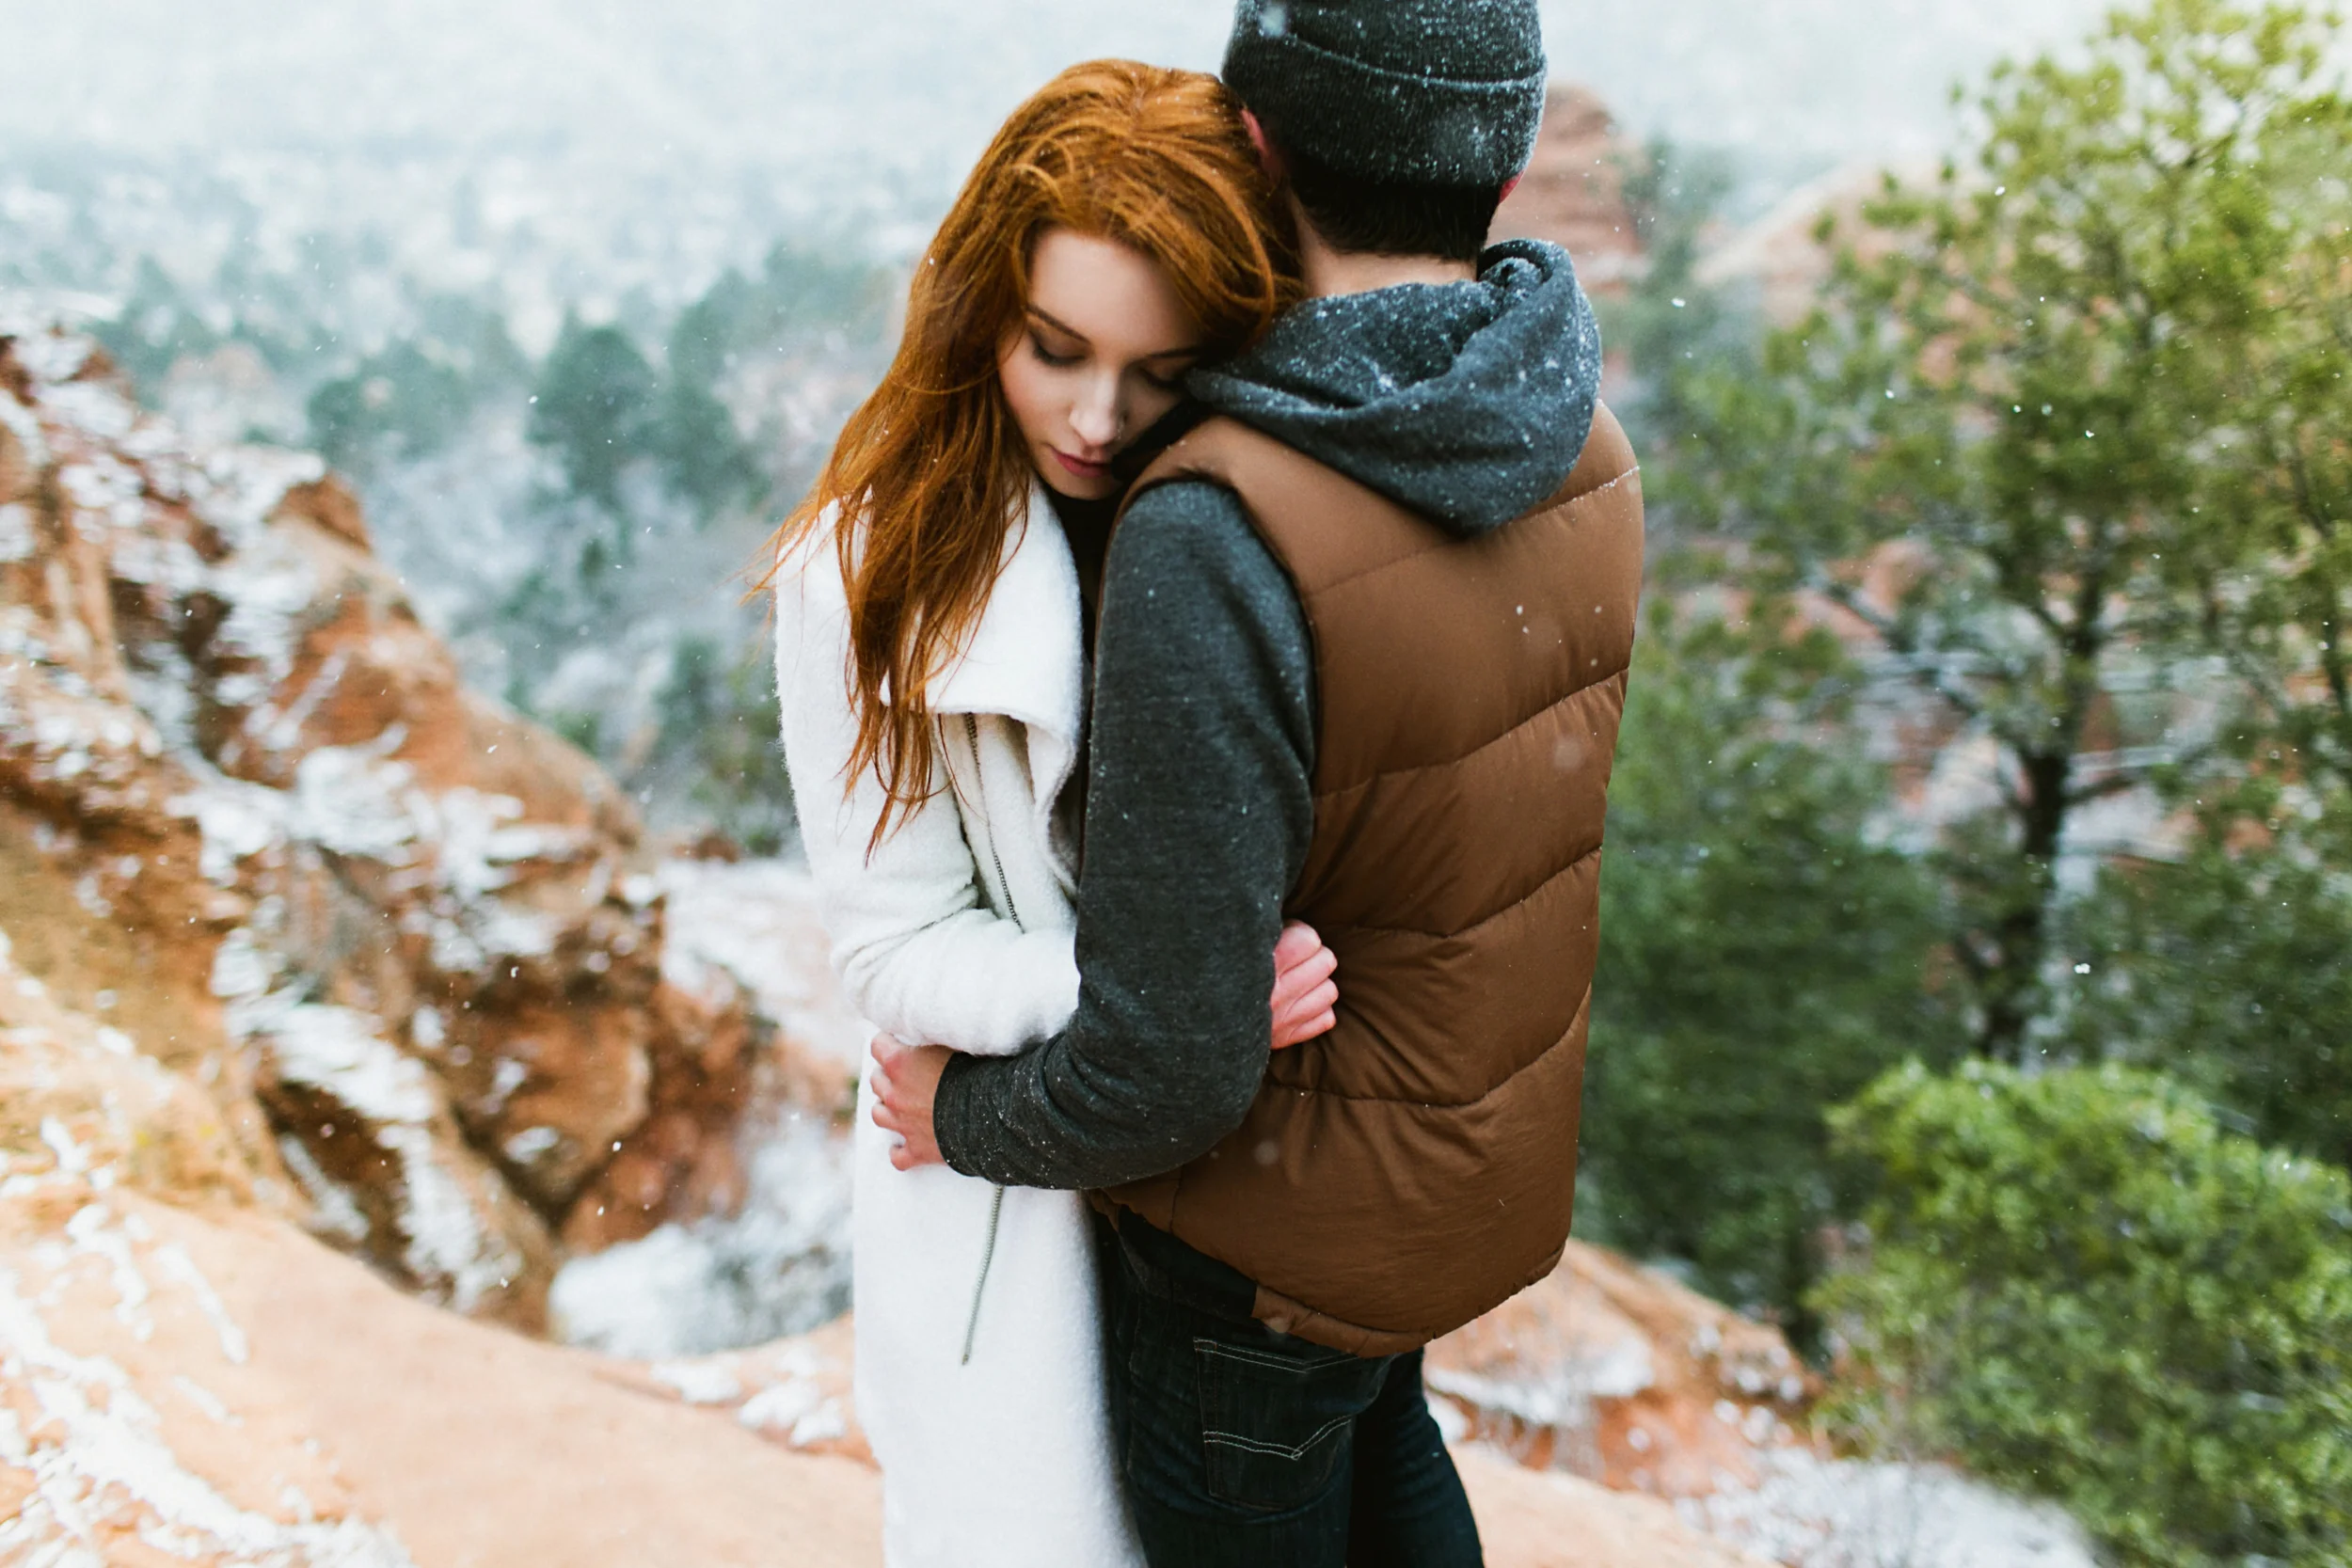
If you haven't shot in the snow before, sorry. It rocks. The snow on the trees and ground becomes a reflector bringing light back into your shadows and leaving your with a gorgeous flattering light. In these conditions, understanding the light coming from the ground and trees is just as important as understanding the light from the sky. If you have a snowy tree close to your left but just open air to your right, you will have strong reflected light coming in from one side and a shadow on the other. In this shot, I had reflected light on either side and the sun diffused through the clouds behind me.

5D III + 50L
During this shoot in Malibu I'm assuming that wearing this coat that's clearly more at home in the PNW attracted those overcast skies that typically stick around up there too. I was planning on shooting pretty heavily backlit but to avoid any dark, muddy skin tones (that typically show up in the shadows when it's overcast) I had Madison face the direction of the light and I had her tilt her head up a bit so it hit her at a more flattering angle. Shooting her in front of a darker backgroundalso helped her pop out of the frame in a scene where the light was all pretty flat.
HIDE & REVEAL
HIDE & REVEAL
HIDE & REVEAL
Intrigue. That's what this little tip is all about. Sometimes the best way to draw someone into a frame is to keep most of the frame a mystery. Use light to reveal only tiny sections of a larger whole. Find spots that combine light/shade (awnings, trees, buildings, or anything else that casts a shadow) and use that to create an image that only shows what you want to show!


TWILIGHT
TWILIGHT
TWILIGHT
No, not the movies. If you love them, nothing personal. I just can't seem to say that word anymore without the thought of fan girls attached to it. Instead, I'm talking about the kind of twilight that I fan girl over. Those 15 (or 30) minutes of light that lasts after the sun drops below the horizon. If you're lucky enough to live somewhere with mountains, that twilight time can last WAY longer since the mountains bring the horizon up a bit higher and the soft light lasts longer before the sun is finally gone. I shoot back light for the majority of a shoot until the twilight comes out to play. Once the sun drops out of site, I typically switch over to front light to take advantage of that gorgeous, soft, flattering light.
5D III + 50L
Hazy golden light when the sun is above the horizon turns into soft warm light when it drops below it. For about two minutes right after the sun is at the horizon, the light will be warm and flattering to the skin before it becomes way cooler in color.

5D III + 50L
Twilight isn't only gorgeous for the softer front light, but it's also perfect for those shots where you have a ton of background. Since the sun is dropped below the horizon, the light everywhere is soft, and pleasing instead of harsh and distracting.
5D III + 35L
Morning has it's twilight too. This frame was shot just before the sun broke the horizon in the morning and I shot it side/front lit to draw a bit more mood into the image. Soft light like this tends to bring out the awesome part of skin texture. Not the bumps, not the pores, but the freckles and color that makes us, us.


5D III + 35L / 5D III + 50L
Just like overcast days, twilight is a perfect time to have your subject looking to the sky for the gorgeous, soft light. When you do, keep in mind that it's still important to know which direction the light is coming from so you don't end up with light going up into their face instead of falling on it from the top. When in doubt, point their legs away from the sunset!

5D III + 35L
Wait long enough and you'll get to the point where you either have to crank your ISO WAY up (nothing wrong with that) or bring your shutter speed way down. This scene above was pretty close to just flat out night time. There wasn't much light left so I brought my shutter speed way down (1/30th ish) and embraced the blur. When shooting slow like that I like to keep something moving in the scene (the wind blowing the dress in this one) and shoot a few more frames than usual to make sure I capture the right moment!

5D III + 50L
Color balance plays a huge role in the aesthetics of an image. One of the most pleasing color combinations (according to me, and backed up by actual scientific studies) is blue and yellow. Twilight gives you that perfect blue light so try mixing it with some warmer light to bring out that blue/yellow combo! Fire light, headlights, etc. The trick is to get that light set up and ready to go in advance. Since the twilight only lasts for a little bit, you might miss it if you don't prepare.

5D IV + 50L
One of my favorite things about twilight is the differences it opens up for editing. If you know my work at all, you know that I love warm, poppy images. What you might not know is that cooler, flatter edits make me giddy too. Twilight is the perfect light for that flatter, cooler look. Editing this type of light with a lower contrast, more muted colors, and a cooler WB will give you a softer, moodier look to compliment your other edits.
MOONLIGHT
MOONLIGHT
MOONLIGHT
Yep, you read that right. It's not the most common thing but I've shot with just moonlight so I wanted to at least include it in here so you know it's an option. It takes a bit more planning (you need to catch a full moon, on a cloudless night, in a location that's pretty reflective (lots of light sand, rocks, etc). Just like twilight, since the moon is a more diffused light (it's literally a giant reflector), I shoot it front light to get that luminous look.

5D IV + 35L (ISO 32,000, 1.4, 1/13th)
Crank up the ISO, Lower your Aperture, and Change your Shutter Speed to taste depending on how much blur you want!
WRAP UP
WRAP UP
I know that shooting outdoors when you have no control over what the sun is doing can be intimidating but the trick is to know what to do with whatever it throws your way. In this section we covered just about every situation it can give you so hopefully you'll be a bit more confident in it now!